Best Practices When Creating a Scripti to Download Somehting to a Computer
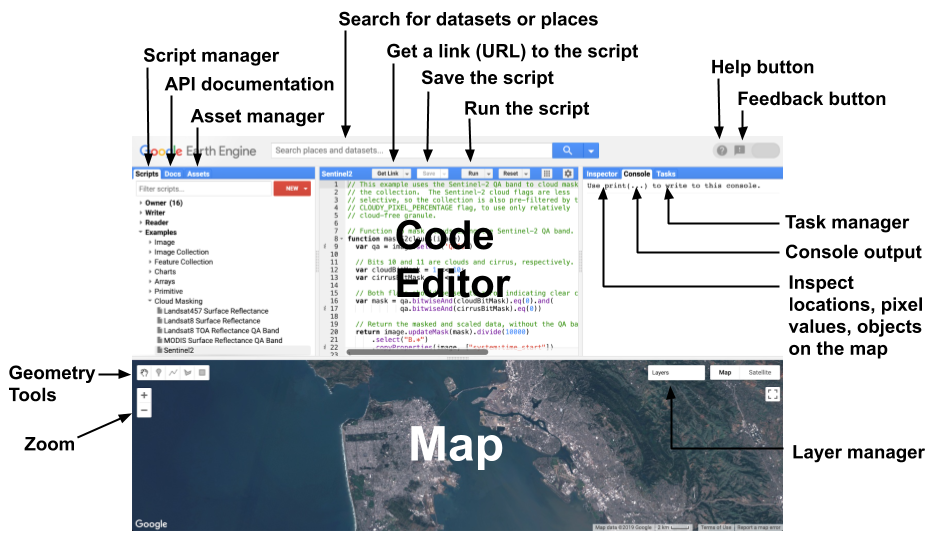
The World Engine (EE) Code Editor at code.earthengine.google.com is a spider web-based IDE for the Earth Engine JavaScript API. Lawmaking Editor features are designed to make developing complex geospatial workflows fast and easy. The Code Editor has the post-obit elements (illustrated in Effigy 1):
- JavaScript code editor
- Map display for visualizing geospatial datasets
- API reference documentation (Docs tab)
- Git-based Script Manager (Scripts tab)
- Console output (Panel tab)
- Task Manager (Tasks tab) to handle long-running queries
- Interactive map query (Inspector tab)
- Search of the data archive or saved scripts
- Geometry cartoon tools
The Lawmaking Editor has a multifariousness of features to assistance y'all take advantage of the Earth Engine API. View example scripts or save your own scripts on the Scripts tab. Query objects placed on the map with the Inspector tab. Brandish and chart numeric results using the Google Visualization API. Share a unique URL to your script with collaborators and friends with the Get Link button. Scripts y'all develop in the Lawmaking Editor are sent to Google for processing and the generated map tiles and/or messages are sent dorsum for brandish in the Map and/or Console tab. All y'all need to run the Code Editor is a web browser (employ Google Chrome for best results) and an internet connection. The following sections depict elements of the Earth Engine Code Editor in more detail.
JavaScript editor
The JavaScript editor will:
- Format and highlight lawmaking as you lot type
- Underline lawmaking with problems, offer fixes and other hints for right syntax
- Autocomplete pairs of quotes, brackets and parentheses
- Offering code completion hints for Earth Engine functions
Above the code editor are buttons for running the script, saving the script, resetting the output map and console, and getting a link to the script. When the Go Link push is pressed, a unique link volition appear in the browser'due south accost bar. This link represents the code in the editor at the time the push was pressed.
API reference (Docs tab)
On the left side of the Code Editor is the Docs tab, which contains the consummate JavaScript API documentation. The documentation can be searched and browsed from the Docs tab.
Script Manager (Scripts tab)
The Scripts tab is side by side to the API Docs in the left panel of the Code Editor. The Script Managing director stores individual, shared and example scripts in Git repositories hosted by Google. The repositories are arranged by access level, with your private scripts stored in a repository you own in the Owner folder: users/username/default. You (and just you lot) have admission to the repositories in the Owner folder unless you share them with someone else. The repositories in the Author binder are repositories for which write access has been granted to y'all by their owner. You can add new scripts to, modify existing scripts in, or change admission to (y'all may not remove their owner) the repositories in the Writer binder. The repositories in the Reader folder are repositories for which read access has been granted to you by their owner. The Examples binder is a special repository managed by Google which contains lawmaking samples. The Archive folder contains legacy repositories to which you have access simply have not even so been migrated past their possessor from an older version of the Script Manager. Search through your scripts using the filter bar at the pinnacle of the Scripts tab.
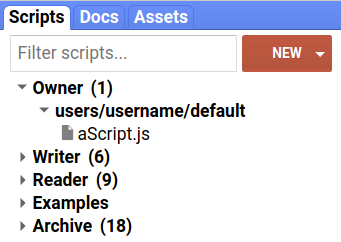
Click the  push to create a new repository in the Owner binder or to create folders and files within a repository. You lot can rename scripts with the icon and delete them with the icon. You tin can move scripts and organize them into folders using elevate and drib (Figure two). If y'all drag a script to another repository, it gets copied.
All scripts and repositories maintain total version history. Click on the icon next to a script or repository to compare or revert it to an older version. To delete a repository, click the icon. To configure admission to a repository, click the icon next to the repository name. Note that if you share a repository, the person with whom you lot're sharing will need to take the repository by clicking the link shown in the settings dialog. Previously accepted repositories can exist hidden by clicking the icon following the repo name in the Script Managing director.
Repositories can be accessed using Git, so y'all can manage and edit your scripts exterior the Lawmaking Editor, or sync them with an external system like GitHub. (Learn more than near Git from this tutorial). Click on the icon adjacent to the repository name for instructions on cloning the repository. Note that yous tin can browse the repositories to which you accept access by going to earthengine.googlesource.com. For some Git operations, you may demand to create hallmark credentials by going to the Generate Password link at the top of the earthengine.googlesource.com folio.
Script modules
It'south good practice to write modular, reusable code that tin can be shared between scripts without extensive copying and pasting. To enable modular evolution, Earth Engine provides the power to share code between scripts. For example, suppose you write a function that performs a useful set of operations. Rather than copy the code of the function into a new script, it's easier for the new script to load the role directly. To brand a function or object bachelor to other scripts, you add information technology to a special object called exports. To use the code in another script, employ the require function to load the exports from another script. For instance, suppose you ascertain the following module in a file named FooModule.js which is in a binder named Modules:
Code Editor (JavaScript)
/** * The Foo module is a demonstration of script modules. * It contains a foo function that returns a greeting string. * It as well contains a bar object representing the current date. * @module Modules/FooModule */ /** * Returns a greeting string. * @param {ee.Cord} arg The name to which the greeting should be addressed * @return {ee.String} The consummate greeting. */ exports.foo = part(arg) { render 'Hello, ' + arg + '! And a good day to yous!'; }; /** * An ee.Engagement object containing the time at which the object was created. */ exports.bar = ee.Engagement(Appointment.now()); Note the use of the exports keyword in the grade of exports.objectToExport. You tin make use of this module in another script by using the require function. For case:
Code Editor (JavaScript)
var Foo = require('users/username/default:Modules/FooModule.js'); print(Foo.dr.); print(Foo.foo('world')); print('Time at present:', Foo.bar); The crave office expects a cord that describes the absolute path to the location of the module. Specifically, the argument of require() is of the course 'pathToRepository:pathToModuleScript'. Y'all can only load modules from repositories that you lot own and/or have read access to. If you want others to be able to utilize your module, the repository must be shared with the other users yous want to have admission. You may wish to certificate your module to assistance others understand how to use it; we recommend using JSDoc way with the @module tag.
You can apply the URL parameter ?scriptPath={repo}:{script} to share a reference to a file in your repo, e.g. https://code.earthengine.google.com/?scriptPath=users/username/utils:utils. Upon visiting the URL, the referenced file and its repo volition be added to either the Reader or Writer directory on the Scripts tab, depending on your permission level for the shared repo.
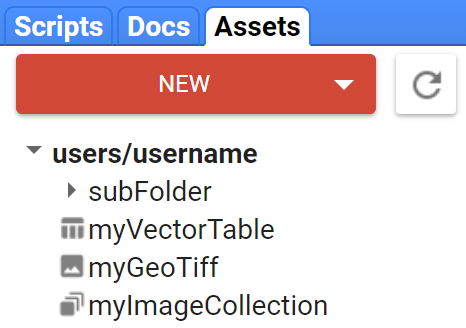
Asset Manager (Assets tab)
The Asset Manager is in the Assets tab in the left console. Use the Asset Manager (Figure 3) to upload and manage your own paradigm assets in Earth Engine. See the Asset Managing director page for details.
Script links
Code Editor scripts can be shared via an encoded URL. The following sections describe various ways to generate a script URL, bachelor options, and methods for managing script URLs.
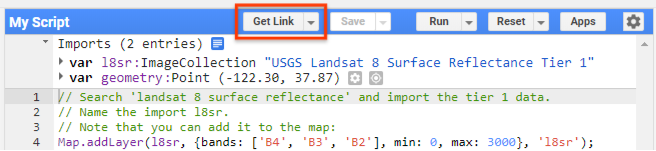
Get link
The "Get Link" button at the top of the Code Editor (Figure 4) provides an interface for generating script URLs and setting script behavior options. Note the distinctions between snapshot and saved script URLs described below.
Snapshot script links
Lawmaking in the Editor can be shared via an encoded snapshot URL that gets created upon clicking the "Get Link" push button at the top of the Code Editor. When the URL is visited by someone with an Earth Engine account, the browser will navigate to the Code Editor and replicate the surroundings as it was when the link was created, including code, imports, map layers, and map position. Clicking the "Go Link" button will automatically copy the script link to the clipboard. Additionally, a dialog box will announced providing options to control the execution of the shared script, along with buttons to copy and visit the generated link. The command options include preventing the script from automatically running, and hiding the code pane when someone opens the shared link. The draggable dialog box can be dismissed via the "Esc" key or a click elsewhere on the folio.
Saved script links
Saved scripts have an choice to share a link that will always load the most contempo saved version and is only attainable by y'all and others with electric current access to the repository containing the script. To use this feature, load a saved script from the Script Manager tab, click the dropdown pointer to the right of the "Get Link" button and select "Re-create Script Path". A dialog box will appear presenting the shareable script URL. Note that the script URL has also been set in the browser's accost bar. For guidance on sharing your repository with others, delight see the Script Managing director section.
Script link management
The dropdown button to the right of the "Get Link" button has an option to "Manage Links". Clicking this option loads a new browser tab with an interface for y'all to think, remove, and download previously generated script links. Selecting a script and pressing the download push button will download a zipped folder ("code_editor_links.nothing") to your system containing a .txt file representation for each selected script.
Script link URL parameters
The ui.url module allows programmatic manipulation of the script URL's fragment identifier via become and gear up methods. This means that Code Editor scripts and Earth Engine Apps can read and store values in the folio'south URL. Find the end of the following two URLs, the first sets the debug variable as faux and the second sets it as true; visit both links and notice that the debug checkbox in the console is not checked in the first, and is checked in the second, changing the beliefs of each script.
https://code.earthengine.google.com/5695887aad76979388a723a85339fbf2#debug=simulated;
https://code.earthengine.google.com/5695887aad76979388a723a85339fbf2#debug=true;
This characteristic can be used to set map zoom and heart, besides as other behaviors you might want to customize when sending links to detail people or groups.
To find datasets to use in your scripts, you can use the search tool for the data archive. The search tool is the text box at the top of the Code Editor that says 'Search places and datasets...' Blazon the name of a information product, sensor, or other keyword into the search bar and click the button to see a list of matching places, raster and table datasets. Click on whatever raster or table result to see the description for that dataset in the annal. To import the dataset straight into your script, click the import link or the  push from the dataset clarification.
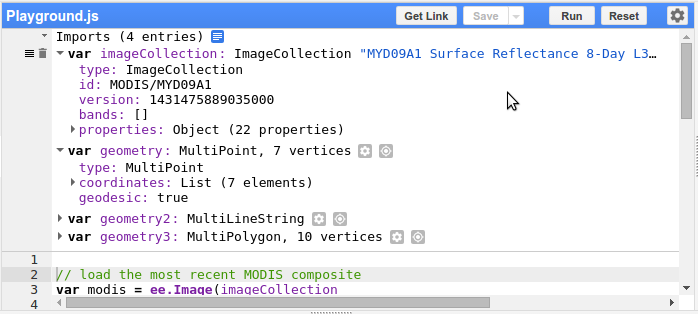
Imports
The results of importing datasets to your script are organized in an imports section at the meridian of your script, subconscious until yous import something. Once you accept created some imports, you should see something similar to Figure 5. To copy imports to another script, or convert the imports to JavaScript, click the icon next to the Imports header and re-create the generated code into your script. You tin delete the import with the icon.
Map
The Map object in the API refers to the map brandish in the Code Editor. For instance, Map.getBounds() will return the geographic region visible in the Lawmaking Editor. Bank check the Map functions in the API to meet other customizations for this display.
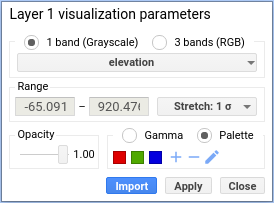
Layer Managing director
Employ the Layer Manager in the upper right corner of the map to adjust the display of layers you lot added to the map. Specifically, you can toggle the visibility of a layer or adjust its transparency with the slider. Click the icon to arrange visualization parameters for individual layers. The visualization tool that appears (Effigy 6) allows you to interactively configure layer display parameters. Click the button on the correct of the tool (which performs a Custom stretch to the supplied min and max range past default) to linearly stretch the display to either percentiles or standard deviations of image values in the display window. Statistics are computed from all the pixels in the Map window at the current zoom level. Use the sliders to adjust gamma and/or transparency. Click the Palette radio button and specify a custom palette past adding colors (), removing colors () or manually entering a comma separated list of hex strings (). Click Apply to apply the visualization parameters to the current brandish. Click Import to load a visualization parameters object every bit a new variable in the imports section of your script.
Note that to the right of the Layer Manager are toggle buttons for different map backgrounds. Customize the background using Map.setStyle().
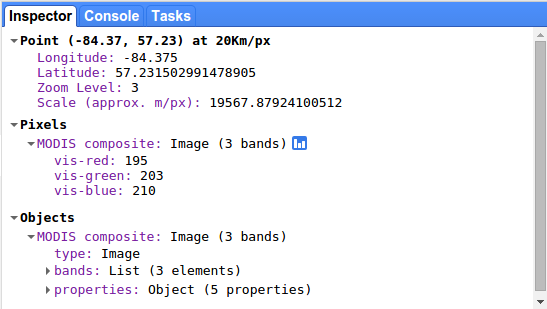
Inspector tab
The Inspector tab next to the Task Manager lets you interactively query the map. When the Inspector tab is activated, the cursor becomes a crosshair which will brandish the location and layer values under the cursor when you click on the map. For case, Figure 7 shows the results of clicking on the map with in the Inspector tab. The cursor location and zoom level are displayed forth with pixel values and a list of objects on the map. The objects list is interactive. To see more information, expand the objects in the Inspector tab.
Console Tab
When you print() something from your script, such equally text, objects or charts, the outcome will be displayed in the Console. The console is interactive, and then you can expand printed objects to become more details nigh them.
Tasks tab
Globe Engine Tasks are operations that are capable of running much longer than the standard API asking timeout. These long-running tasks are the only machinery for creating persistent artifacts in Earth Engine and adjacent systems (Google Cloud Storage, Google Drive, etc.), and they autumn into ii categories: Import and Export.
Import tasks can be used to upload images or upload tables into Globe Engine from a diversity of filetypes (.csv, .tif, etc.). Export tasks tin be used to execute and write results from the EE computation arrangement (see the guide for exporting information ).
For exports, each call to an Export function in the Code Editor will populate an entry in the Unsubmitted tasks section of the Tasks tab. To submit an export job to the server, click the Run button adjacent to the task. A configuration dialog will announced that allows you to specify a variety of parameters for the task. If the chore is fully specified at cosmos time (that is, the call to Export has all necessary parameters), hold ctrl or ⌘ while clicking Run to submit the task without showing the dialog.
For imports, file upload happens locally before the task is submitted to the server. Import tasks in the upload phase will show their progress in the Unsubmitted tasks section and automatically submit to the server once the file upload is complete.
Unsubmitted tasks just appear on the folio which created them, and they are lost when the page is closed. One time a task is submitted to the server, clicking on its row in the UI volition provide additional information and options almost the task status, including the selection to request cancellation.
To view, search and abolish many tasks in a full-page view (including on mobile clients), use the Task Manager.
Profiler
The profiler displays data about the resource (CPU time, memory) consumed by specific algorithms and other parts of a ciphering. This helps to diagnose why a script is running slowly or failing due to memory limits. To use the profiler, click the Run with profiler pick in the dropdown on the Run push button. Equally a shortcut, agree downwards Alt (or Option on Mac) and click Run, or press Ctrl+Alt+Enter. This activates a Profiler tab on the right side of the lawmaking editor. Equally the script runs, the Profiler tab volition display a tabular array of resource usage from the script. Clicking the Run button (without profiling) will make the Profiler tab disappear and disable the profiler.
The profiler displays information about CPU and retentivity usage (per algorithm and asset) resulting from computations invoked by the script and the display of every tile currently visible in the map. Each row in the profiler output corresponds to an algorithm, computation, nugget load or overhead operation as described in the 'Description' column. The columns in the profiler are:
- Clarification
- A textual description of the computation, algorithm, asset load or overhead operation being profiled.
- Count
- An indicator proportional to the number of times the operation described in 'Description' was invoked.
- Compute
- An indicator of CPU time taken past the operation(s).
- Current Mem
- This column appears only if in that location was an error considering the script used as well much memory. It shows the corporeality of retention in use on whatever unmarried compute node at the moment the error occurred.
- Peak Mem
- Maximum retentiveness used on any single compute node for the performance.
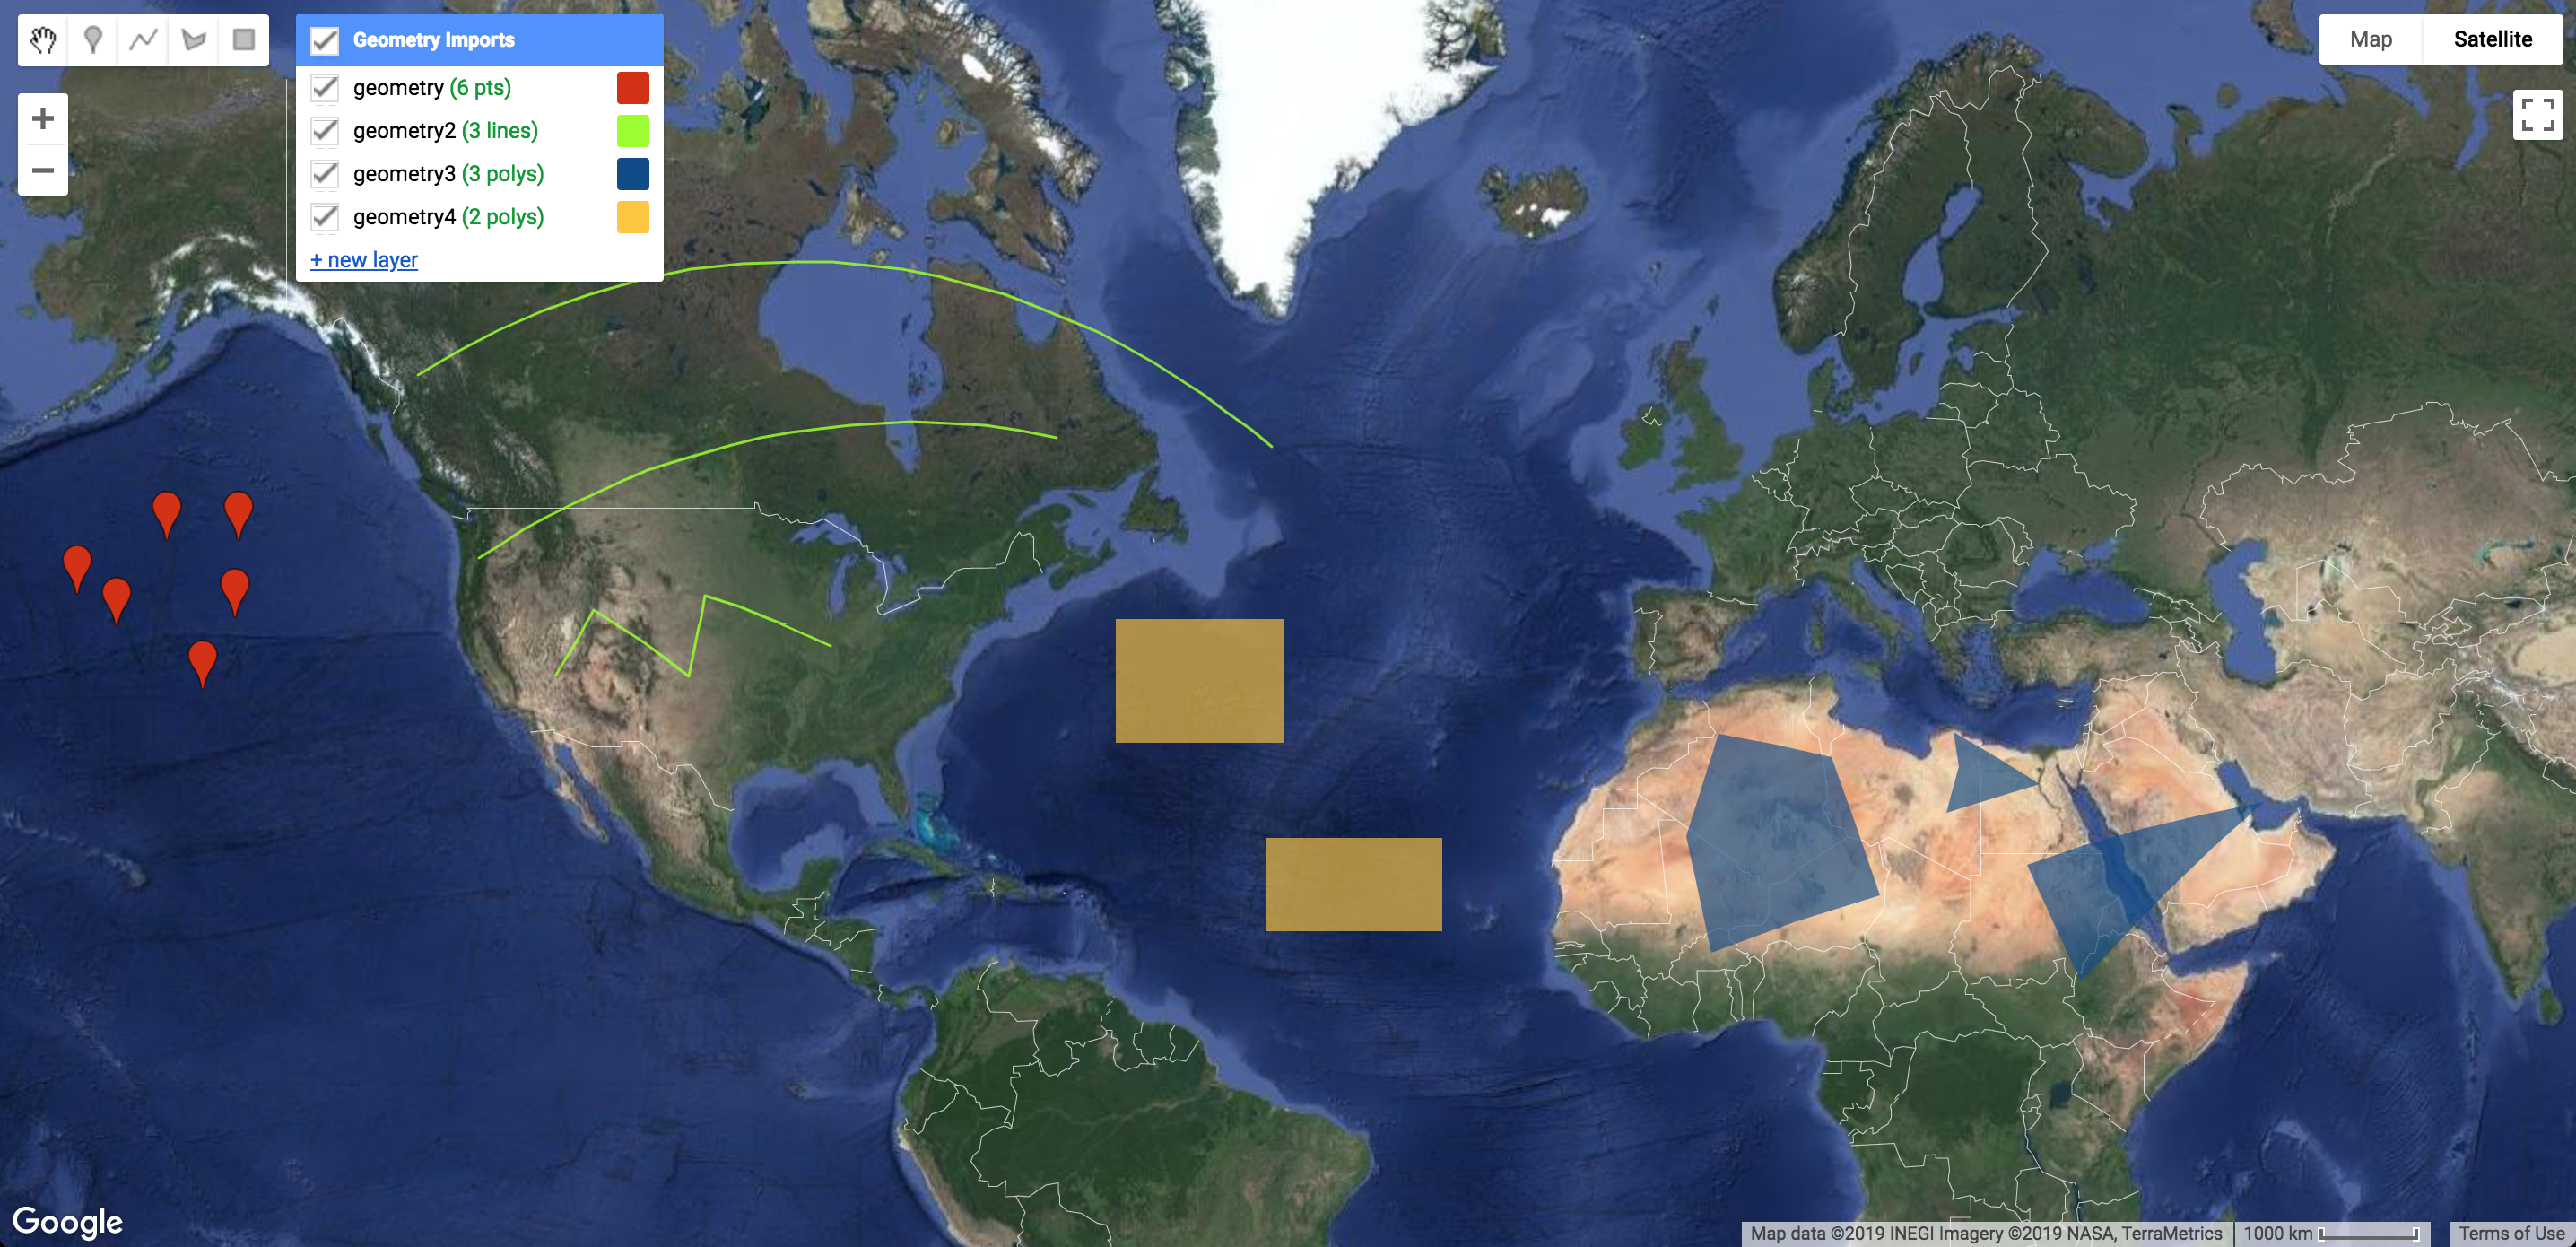
You can also import geometries to your script by cartoon them on screen. To create geometries, apply the geometry drawing tools in the upper left corner of the map display (Figure 8). For cartoon points, utilise the placemark icon  , for cartoon lines, use the line icon
  , for cartoon polygons, utilise the polygon icon
  , for cartoon rectangles utilize the rectangle icon
  . (Note that rectangles are planar geometries, so they cannot be placed on a layer with geodesic geometries like lines and polygons.)
Using any of the cartoon tools will automatically create a new geometry layer and add an import for that layer to the Imports department. To add geometries to a new layer, hover on the Geometry Imports in the map display and click the +new layer link. You tin can too toggle visibility of the geometries from the Geometry Imports section. Annotation that drawn geometries are geodesic by default, except for rectangles, which are planar merely. Utilize the Geometry constructor to catechumen them to planar geometries. Learn more near geometries in Earth Engine on the Geometry page.
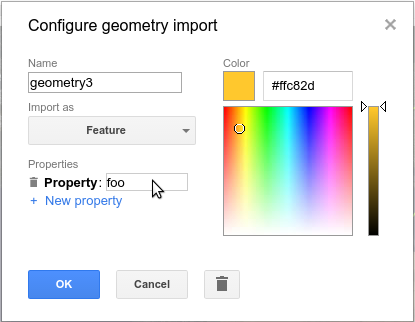
To configure the mode geometries are imported to your script, click the icon side by side to the layer in the Geometry Imports section on the map or in the Imports section of the code editor. The geometry layer settings tool will be displayed in a dialog box which should await something like Figure 9. Note that you tin import the drawn shapes as geometries, features or characteristic collections. The geometry import settings also allow you lot to change the color with which the layer is displayed, add backdrop to the layer (if it is imported as a Feature or FeatureCollection) or rename the layer.
Finally, to prevent geometries in a layer from being edited, you can lock the layer by pressing the icon next to the layer. This will prevent adding, deleting, or editing any geometries on the layer. To unlock the layer again, press the icon.
Help!
Click the push button in the upper right of the Code Editor to see links to this Developer's Guide, other help forums, a guided tour of the Code Editor and a list of keyboard shortcuts that help with coding, running code, and displaying information on the Map. Click the button to file a bug report, request a new feature, suggest a dataset, or otherwise send feedback when no response is needed.
DOWNLOAD HERE
Posted by: williamsdeach1985.blogspot.com

